Correcting record types and numbers

There's an interesting question posted on the HPE Content Manager forum.  This post will be a response to that question....

DataPort can only update an existing record if it uses the expanded number (non-compressed record number) as the unique ID for searching.  If your spreadsheet contains the record number and you match it to the expanded number field, it will first attempt to update before creating the record.  This behavior removes any ability to change the record number property via DataPort.

I mocked up the environment with the record types described and was able to generate the picture below.  The goal, I believe, is to change the pink document records (Personal) to become teal document records (Corporate).

2017-12-01_15-51-11.png

To model this environment I created a powershell script that built out these records.  This assumes you already have the 4 described record types (or you've modified this script to accommodate your environment). 

WARNING: This script creates one folder with number "17/99999" and removes any records contained inside.  It is not intended to be run in a production environment.  It is only used to prove the final solution works correctly.

#Prepare the host and load the CM SDK/Database
Clear-Host
Add-Type -Path "d:\Program Files\Hewlett Packard Enterprise\Content Manager\HP.HPTRIM.SDK.dll"
$Database = New-Object HP.HPTRIM.SDK.Database
$Database.Connect()
 
#Load the various record types
$PersonalFolderRecordType = $Database.FindTrimObjectByName([HP.HPTRIM.SDK.BaseObjectTypes]::RecordType, "Personal Files")
$PersonalDocumentRecordType = $Database.FindTrimObjectByName([HP.HPTRIM.SDK.BaseObjectTypes]::RecordType, "Personal Document")
$CorporateFolderRecordType = $Database.FindTrimObjectByName([HP.HPTRIM.SDK.BaseObjectTypes]::RecordType, "Corporate Files")
$CorporateDocumentRecordType = $Database.FindTrimObjectByName([HP.HPTRIM.SDK.BaseObjectTypes]::RecordType, "Corporate Document")
 
#Prepare the example set
$FolderNumber = "17/99999"
$ExemplarFolder = $Database.FindTrimObjectByName([HP.HPTRIM.SDK.BaseObjectTypes]::Record, $FolderNumber)
if ( $ExemplarFolder -eq $null ) {
    $ExemplarFolder = New-Object HP.HPTRIM.SDK.Record -ArgumentList $Database, $CorporateFolderRecordType
    $ExemplarFolder.LongNumber = $FolderNumber    #Assumes pattern is "YY/GGGGG"
    $ExemplarFolder.TypedTitle = "test"
    $ExemplarFolder.Save()
    Write-Host "Created folder $($ExemplarFolder)"
} else {
    #purge any existing records
    $ExistingContents = New-Object HP.HPTRIM.SDK.TrimMainObjectSearch -ArgumentList $Database,Record
    $ExistingContents.SearchString = "container:[uri:$($ExemplarFolder.Uri)]"
    foreach ( $Result in $ExistingContents ) 
    {
        Write-Host "Removing existing record $(([HP.HPTRIM.SDK.Record]$Result).Number)"
        ([HP.HPTRIM.SDK.Record]$Result).Delete()
    }
}
 
#Create 4 records within the folder, the first 2 personal and the second 2 corporate
for ( $i = 0; $i -lt 4; $i++ ) {
    $ExemplarDocument = New-Object HP.HPTRIM.SDK.Record -ArgumentList $Database, $(If ( $i -lt 2 ) { $PersonalDocumentRecordType } Else { $CorporateDocumentRecordType })
    $ExemplarDocument.DateRegistered = (get-date).AddYears(-1*$i)
    $ExemplarDocument.DateCreated = (get-date).AddYears(-1*$i)
    $ExemplarDocument.TypedTitle = "test"
    $ExemplarDocument.SetContainer($ExemplarFolder,$true)
    $ExemplarDocument.Save()
    Write-Host "Created document $($ExemplarDocument.Number)"
}

When I run the script above I get one folder with four documents.  If I run it a second time the folder will be re-used, any existing documents will be removed, and the original sample will be re-created.

2017-12-01_23-29-25.png

In a new script I craft a high-level approach to resolving the problem.  First I find all corporate folders.  Then for each folder found, I search within for any personal documents.  I'll process each one and then continue until all found documents and folders are processed.

#Prepare the host and load the CM SDK/Database
Clear-Host
Add-Type -Path "d:\Program Files\Hewlett Packard Enterprise\Content Manager\HP.HPTRIM.SDK.dll"
$Database = New-Object HP.HPTRIM.SDK.Database
$Database.Connect()
 
#Load the various record types
$PersonalFolderRecordType = $Database.FindTrimObjectByName([HP.HPTRIM.SDK.BaseObjectTypes]::RecordType, "Personal Files")
$PersonalDocumentRecordType = $Database.FindTrimObjectByName([HP.HPTRIM.SDK.BaseObjectTypes]::RecordType, "Personal Document")
$CorporateFolderRecordType = $Database.FindTrimObjectByName([HP.HPTRIM.SDK.BaseObjectTypes]::RecordType, "Corporate Files")
$CorporateDocumentRecordType = $Database.FindTrimObjectByName([HP.HPTRIM.SDK.BaseObjectTypes]::RecordType, "Corporate Document")
 
#Find all corporate folders
$CorporateFolders = New-Object HP.HPTRIM.SDK.TrimMainObjectSearch -ArgumentList $Database, Record
$CorporateFolders.SearchString = "type:[uri:$($CorporateFolderRecordType.Uri)]"
foreach ( $CorporateFolder in $CorporateFolders ) {
    #Find and process all personal documents
    $PersonalDocuments = New-Object HP.HPTRIM.SDK.TrimMainObjectSearch -ArgumentList $Database, Record
    $PersonalDocuments.SearchString = "container:$($CorporateFolder.Uri) type:[uri:$($PersonalDocumentRecordType.Uri)]"
    Write-Host "Folder $($CorporateFolder.Number) has $($PersonalDocuments.Count) documents to fix"
    foreach ( $PersonalDocument in $PersonalDocuments ) {
        #Change record type and number
        Write-Host "Fixing Document $($PersonalDocument.Number)"
    }
}

Running this script gives me the following results...

2017-12-01_16-06-01.png

Sweet!  Now I just need some logic that actually fixes the record.  First I'll have it change the record type.  Then I'll figure out the appropriate prefix for the record's new record number (D17#, D16#, D11#, whatever).  With that in-hand I'll search for all records starting with that prefix, sorted to give me the last number first.  I grab that number and add one.  If there are no records from that year (which is the case in my scenario from the powershell script above) then I use 1 as the starting point.  

$PersonalDocument.RecordType = $CorporateDocumentRecordType
        #Figure out the correct number
        $Prefix = "D$($PersonalDocument.DateRegistered.Year.ToString().Substring(2))"
        $LastRecords = New-Object HP.HPTRIM.SDK.TrimMainObjectSearch -ArgumentList $database, Record
        $LastRecords.SearchString = "number:$($prefix)*"
        $LastRecords.SetSortString("number-")
        if ( $LastRecords.Count -eq 0 ) {
            $RecordNumber = "$($prefix)#1"
        } else {
            $Enumerator = $LastRecords.GetEnumerator()
            $Enumerator.MoveNext()
            $Record = [HP.HPTRIM.SDK.Record]$Enumerator.Current
            $LastNumber = $Record.Number.Replace("$($prefix)#","")
            $RecordNumber = "$($prefix)#$([convert]::ToInt32($LastNumber)+1)"
        }
        $PersonalDocument.LongNumber = $RecordNumber
        $PersonalDocument.Save()

After I run this I can see the changes within the client. Success!

2017-12-01_16-25-29.png

It's worth pointing out that in the newer versions of CM you can prevent users from storing personal documents into corporate containers.  

The complete script that fixes all records in the dataset is as follows:

#Prepare the host and load the CM SDK/Database
Clear-Host
Add-Type -Path "d:\Program Files\Hewlett Packard Enterprise\Content Manager\HP.HPTRIM.SDK.dll"
$Database = New-Object HP.HPTRIM.SDK.Database
$Database.Connect()
 
#Load the various record types
$PersonalFolderRecordType = $Database.FindTrimObjectByName([HP.HPTRIM.SDK.BaseObjectTypes]::RecordType, "Personal Files")
$PersonalDocumentRecordType = $Database.FindTrimObjectByName([HP.HPTRIM.SDK.BaseObjectTypes]::RecordType, "Personal Document")
$CorporateFolderRecordType = $Database.FindTrimObjectByName([HP.HPTRIM.SDK.BaseObjectTypes]::RecordType, "Corporate Files")
$CorporateDocumentRecordType = $Database.FindTrimObjectByName([HP.HPTRIM.SDK.BaseObjectTypes]::RecordType, "Corporate Document")
 
#Find all corporate folders
$CorporateFolders = New-Object HP.HPTRIM.SDK.TrimMainObjectSearch -ArgumentList $Database, Record
$CorporateFolders.SearchString = "type:[uri:$($CorporateFolderRecordType.Uri)]"
foreach ( $CorporateFolder in $CorporateFolders ) {
    #Find and process all personal documents
    $PersonalDocuments = New-Object HP.HPTRIM.SDK.TrimMainObjectSearch -ArgumentList $Database, Record
    $PersonalDocuments.SearchString = "container:$($CorporateFolder.Uri) type:[uri:$($PersonalDocumentRecordType.Uri)]"
    Write-Host "Folder $($CorporateFolder.Number) has $($PersonalDocuments.Count) documents to fix"
    foreach ( $PersonalDocument in $PersonalDocuments ) {
        #Change record type and number
        Write-Host "Fixing Document $($PersonalDocument.Number)"
        $PersonalDocument.RecordType = $CorporateDocumentRecordType
        #Figure out the correct number
        $Prefix = "D$($PersonalDocument.DateRegistered.Year.ToString().Substring(2))"
        $LastRecords = New-Object HP.HPTRIM.SDK.TrimMainObjectSearch -ArgumentList $database, Record
        $LastRecords.SearchString = "number:$($prefix)*"
        $LastRecords.SetSortString("number-")
        if ( $LastRecords.Count -eq 0 ) {
            $RecordNumber = "$($prefix)#1"
        } else {
            $Enumerator = $LastRecords.GetEnumerator()
            $Enumerator.MoveNext()
            $Record = [HP.HPTRIM.SDK.Record]$Enumerator.Current
            $LastNumber = $Record.Number.Replace("$($prefix)#","")
            $RecordNumber = "$($prefix)#$([convert]::ToInt32($LastNumber)+1)"
        }
        $PersonalDocument.LongNumber = $RecordNumber
        $PersonalDocument.Save()
    }
}

Creating an installer for an addin

In a previous post I created my Tesseract OCR client add-in.  To test that it worked properly, I registered the client add-in using the debug output path for the assembly location.  This allows me to debug the add-in but won't work on any other workstation.  Therefore I need to package the add-in into an installer, which would place the required files in a consistent location I can reference when registering the add-in.  

To create an installer you'll need the WiX toolset.  You can then add a new project to the solution using the Setup Project for WiX v3 project template, as shown below.  Note that can you create multiple installers within a given solution (which I'm doing since I have two different add-ins: client and event).  

 
2017-11-29_13-52-32.png
 

Anytime I add a new project to the solution I revisit the configuration manager.  Since I can envision wanting to debug the add-in without any need to create an installer, I decide to create a new solution configuration named "debug (installers)". 

 
Note the active configuration (debug) does not build installers

Note the active configuration (debug) does not build installers


I leave the existing debug configuration alone and then modify the new one.  The debug installer configuration should build all of the projects.  Installing that output allows you to attach a debug session to an installed copy of the add-in.  The release configuration is identical, except each project configuration is set to release.

 
2017-11-29_14-00-48.png
 

The WiX project template results in one file being creating within the project: "Product.wxs".  Before tackling that file, I immediately add a reference to the addin project and the WixUIExtension library.  The UI extension library will allow me to create a custom UI navigation that prompts the user for the installation path.

I then created a file named UI.wxs and used the content shown below.

<?xml version="1.0" encoding="UTF-8"?>
<Wix xmlns="http://schemas.microsoft.com/wix/2006/wi">
  <Fragment>
    <UI Id="AddinUI">
      <TextStyle Id="WixUI_Font_Normal" FaceName="Tahoma" Size="8" />
      <TextStyle Id="WixUI_Font_Bigger" FaceName="Tahoma" Size="12" />
      <TextStyle Id="WixUI_Font_Title" FaceName="Tahoma" Size="9" Bold="no" />
      <UIRef Id="WixUI_ErrorProgressText" />
      <Property Id="DefaultUIFont" Value="WixUI_Font_Normal" />
      <Property Id="WixUI_Mode" Value="InstallDir" />
      <DialogRef Id="BrowseDlg" />
      <DialogRef Id="DiskCostDlg" />
      <DialogRef Id="ErrorDlg" />
      <DialogRef Id="FatalError" />
      <DialogRef Id="FilesInUse" />
      <DialogRef Id="MsiRMFilesInUse" />
      <DialogRef Id="PrepareDlg" />
      <DialogRef Id="ProgressDlg" />
      <DialogRef Id="ResumeDlg" />
      <DialogRef Id="UserExit" />
      <Publish Dialog="BrowseDlg" Control="OK" Event="DoAction" Value="WixUIValidatePath" Order="3">1</Publish>
      <Publish Dialog="BrowseDlg" Control="OK" Event="SpawnDialog" Value="InvalidDirDlg" Order="4"><![CDATA[WIXUI_INSTALLDIR_VALID<>"1"]]></Publish>
      <Publish Dialog="ExitDialog" Control="Finish" Event="EndDialog" Value="Return" Order="999">1</Publish>
      <Publish Dialog="WelcomeDlg" Control="Next" Event="NewDialog" Value="InstallDirDlg">NOT Installed</Publish>
      <Publish Dialog="InstallDirDlg" Control="Back" Event="NewDialog" Value="WelcomeDlg">1</Publish>
      <Publish Dialog="InstallDirDlg" Control="Next" Event="SetTargetPath" Value="[WIXUI_INSTALLDIR]" Order="1">1</Publish>
      <Publish Dialog="InstallDirDlg" Control="Next" Event="DoAction" Value="WixUIValidatePath" Order="2">NOT WIXUI_DONTVALIDATEPATH</Publish>
      <Publish Dialog="InstallDirDlg" Control="Next" Event="SpawnDialog" Value="InvalidDirDlg" Order="3"><![CDATA[NOT WIXUI_DONTVALIDATEPATH AND WIXUI_INSTALLDIR_VALID<>"1"]]></Publish>
      <Publish Dialog="InstallDirDlg" Control="Next" Event="NewDialog" Value="VerifyReadyDlg" Order="4">WIXUI_DONTVALIDATEPATH OR WIXUI_INSTALLDIR_VALID="1"</Publish>
      <Publish Dialog="InstallDirDlg" Control="ChangeFolder" Property="_BrowseProperty" Value="[WIXUI_INSTALLDIR]" Order="1">1</Publish>
      <Publish Dialog="InstallDirDlg" Control="ChangeFolder" Event="SpawnDialog" Value="BrowseDlg" Order="2">1</Publish>
      <Publish Dialog="VerifyReadyDlg" Control="Back" Event="NewDialog" Value="InstallDirDlg" Order="1">NOT Installed</Publish>
      <Publish Dialog="VerifyReadyDlg" Control="Back" Event="NewDialog" Value="MaintenanceTypeDlg" Order="2">Installed AND NOT PATCH</Publish>
      <Publish Dialog="VerifyReadyDlg" Control="Back" Event="NewDialog" Value="WelcomeDlg" Order="2">Installed AND PATCH</Publish>
      <Publish Dialog="MaintenanceWelcomeDlg" Control="Next" Event="NewDialog" Value="MaintenanceTypeDlg">1</Publish>
      <Publish Dialog="MaintenanceTypeDlg" Control="RepairButton" Event="NewDialog" Value="VerifyReadyDlg">1</Publish>
      <Publish Dialog="MaintenanceTypeDlg" Control="RemoveButton" Event="NewDialog" Value="VerifyReadyDlg">1</Publish>
      <Publish Dialog="MaintenanceTypeDlg" Control="Back" Event="NewDialog" Value="MaintenanceWelcomeDlg">1</Publish>
      <Publish Dialog="CustomizeDlg" Control="Back" Event="NewDialog" Value="CustomizeDlg">1</Publish>
      <Publish Dialog="CustomizeDlg" Control="Next" Event="NewDialog" Value="CustomizeDlg">1</Publish>
      <Publish Dialog="InstallDirDlg" Control="Next" Event="NewDialog" Value="CustomizeDlg">1</Publish>
      <Property Id="ARPNOMODIFY" Value="1" />
    </UI>
    <UIRef Id="WixUI_Common" />
  </Fragment>
</Wix>

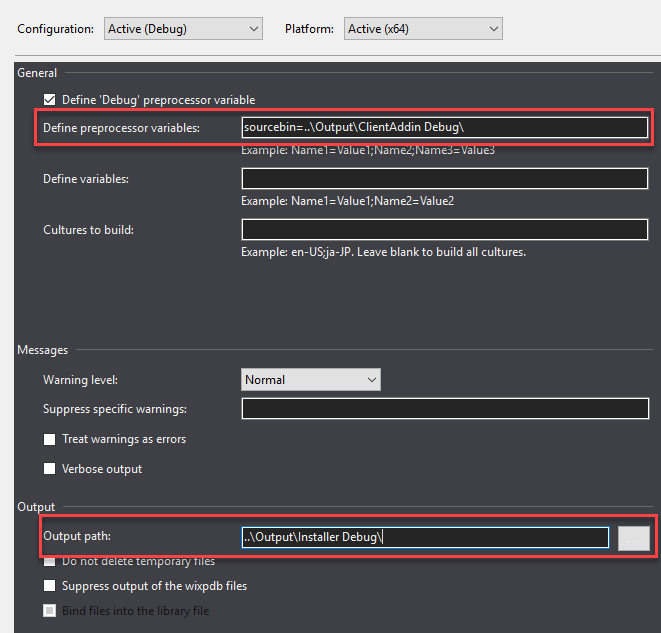
Next I modified the project so that there is a preprocessor variable for the source of files, the output is placed into an alternate location, and heat is used to harvest content.  Below you can see those first two changes.  This was done for all the project configurations.

 
2017-11-29_14-17-05.png
 

In the build events I created a heat command that harvests the files into "Content.wxs"...

 
2017-11-29_14-20-28.png
 

The full text of the command:

 
heat dir "$(SolutionDir)Output\ClientAddin $(ConfigurationName)" -dr INSTALLFOLDER -var var.sourcebin -srd -sreg -gg -cg AddinComponents -out "$(ProjectDir)Content.wxs"
 

Next I added a new file to the solution named "Content.wxs".  This file will be replaced each time the project is built (the heat command above generates the content based on the output from the other project).  The variable parameter matches the preprocessor variable name used in the project properties, effectively ensuring any future changes to the add-in will be included in the installer.

The last step is to update the product file.  Within it I added all the usual manufacturer, product, and media information.  Then I removed everything else (the default fragments provided by the project template).  Instead I reference the UI and the add-in components generated by heat command.

<?xml version="1.0" encoding="UTF-8"?>
<Wix xmlns="http://schemas.microsoft.com/wix/2006/wi">
  <Product Id="*" Name="CMRamble Ocr ClientAddin" Language="1033" Version="1.0.0.0" Manufacturer="CMRamble.com" UpgradeCode="05ff6529-a724-4eaf-a199-d920ef03bc20">
    <?define IFOLDER = "INSTALLFOLDER"?>
    <?define InfoURL="https://cmramble.com" ?>
    <Package InstallerVersion="300" Compressed="yes" InstallScope="perUser" />
    <MajorUpgrade DowngradeErrorMessage="A newer version of [ProductName] is already installed." />
    <Media Id="1" Cabinet="ClientAddin.cab" EmbedCab="yes"/>
    <Feature Id="ProductFeature" Title="Installer" Level="1">
      <ComponentGroupRef Id="AddinComponents" />
    </Feature>
    <Property Id="ARPHELPLINK" Value="$(var.InfoURL)" />
    <Property Id="WIXUI_INSTALLDIR" Value="$(var.IFOLDER)"/>
    <UIRef Id="AddinUI" />
  </Product>
  <Fragment>
    <Directory Id="TARGETDIR" Name="SourceDir">
      <Directory Id="ProgramFiles64Folder">
        <Directory Id="CMRambleFolder" Name="CMRamble">
          <Directory Id="OcrFolder" Name="Ocr">
            <Directory Id="INSTALLFOLDER" Name="ClientAddin" />
          </Directory>
        </Directory>
      </Directory>
    </Directory>
  </Fragment>
</Wix>

All done!  I repeated the process for the event processor plugin and then hit build.  The result is an installer for each.

2017-11-29_14-28-25.png

If I launch the client add-in installer I see the UI I defined in the UI.wsx file.  It sequenced the user from the welcome dialog to the installation path dialog.  Clicking next should ask the user where to install it.

2017-11-29_22-07-21.png

It behaves as expected!  The path you supply here is what you will use when later registering the add-in within the client, so it must be consistent across your organization. 

2017-11-29_22-11-03.png

Clicking next shows the ready to install dialog and an install button.  

2017-11-29_22-12-26.png

Once installation has completed, a new folder will exist on the workstation.  It should contain all of the files harvested from the client add-in project.  As the solution grows the installer should automatically keep-up with new references.

Contents of Client Addin installation on workstation

Contents of Client Addin installation on workstation

Within the client the add-in is managed by clicking external links on the administration ribbon.

2017-11-29_22-16-22.png

Then click new generic add-in (.Net)...

2017-11-29_22-17-57.png

Provide a name (this can be anything you want) and select the most appropriate path for your environment.

2017-11-29_22-21-22.png

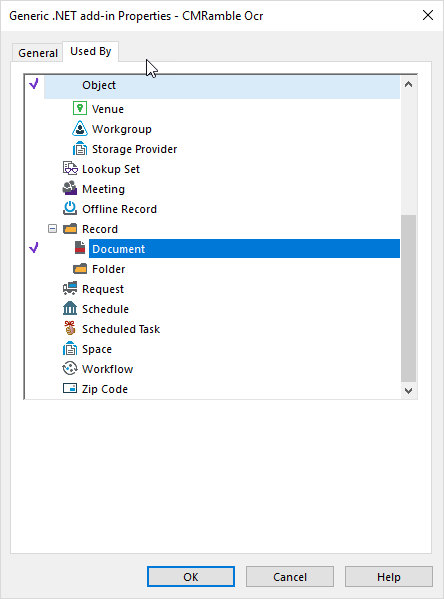
If you can click OK without receiving an error message, then you have a valid configuration (according to this workstation).  Once the valid configuration has been saved, you must click properties to enable the add-in on specific objects. 

2017-11-29_22-23-04.png

The client add-in is intended for electronic documents so I enabled the document record type.

2017-11-29_22-25-03.png

A quick test of the custom actions proves the installer worked successfully end-to-end.

2017-11-29_22-25-48.png

You can access the latest installers here.

Using metrics to help validate an upgrade

When upgrading from one version to another, a typical project plan will include a task to verify the integrity of the data post-schema upgrade.  Often times an administrator will run some simple searches to verify data integrity.  For instance: compare the total number of records in the dataset before and after the upgrade.  I've done just that countless times.

In the age of powershell this becomes significantly easier.  We can leverage the Content Manager .Net SDK and perform base object searches dynamically.  This obviates the need to have an administrator manually perform searches before and after an upgrade.

An upgrade report might include a table like this:

Sample Object Count Report from an Upgrade

Sample Object Count Report from an Upgrade

To generate the metrics for the above report you can execute this powershell script as a CM administrator with highest privileges (or as the CM service account).  Execute the script before and after the schema upgrade.

Clear-Host
Add-Type -Path "C:\Program Files\Hewlett Packard Enterprise\Content Manager\HP.HPTRIM.SDK.dll"
$Database = New-Object HP.HPTRIM.SDK.Database
$Database.Connect()
$ObjectTypes = [enum]::GetNames([HP.HPTRIM.SDK.BaseObjectTypes]) | Sort
$ObjectMetrics = [ordered]@{}
foreach ( $baseObjectType in $ObjectTypes ) {
    try {
        $MainObjectSearch = New-Object HP.HPTRIM.SDK.TrimMainObjectSearch -ArgumentList $Database, $baseObjectType -ErrorAction SilentlyContinue
        $MainObjectSearch.SearchString = "all"
        $ObjectMetrics.Add($baseObjectType, $MainObjectSearch.Count)
    } 
    catch [HP.HPTRIM.SDK.TrimException] {
    }
}
$ObjectMetrics | Format-Table

The output from this script gives you the raw numbers for any validation efforts.

Sample output from script

Sample output from script