Enriching Record Metadata via the Google Vision API

Many times the title of the uploaded file doesn't convey any real information.  We often ask users to supply additional terms, but we can also use machine learning models to automatically tag records.  This enhances the user's experience and provides more opportunities for search.  

faulkner.jpg
Automatically generated keywords, provided by the Vision API

Automatically generated keywords, provided by the Vision API

In the rest of the post I'll show how to build this plugin and integrate it with the Google Vision Api...


First things first, I created a solution within Visual Studio that contains one class library.  The library contains one class named Addin, which is derived from the TrimEventProcessorAddIn base class.  This is the minimum needed to be considered an "Event Processor Addin".

using HP.HPTRIM.SDK;
 
namespace CMRamble.EventProcessor.VisionApi
{
    public class Addin : TrimEventProcessorAddIn
    {
        public override void ProcessEvent(Database db, TrimEvent evt)
        {
        }
    }
}

Next I'll add a class library project with a skeleton method named AttachVisionLabelsAsTerms.  This method will be invoked by the Event Processor and will result in keywords being attached for a given record.  To do so it will call upon the Google Vision Api.  The event processor itself doesn't know anything about the Google Vision Api.

using HP.HPTRIM.SDK;
 
namespace CMRamble.VisionApi
{
    public static class RecordController
    {
        public static void AttachVisionLabelsAsTerms(Record rec)
        {
 
        }
    }
}

Before I can work with the Google Vision Api, I have to import the namespace via the NuGet package manager.

The online documentation provides this sample code that invokes the Api:

var image = Image.FromFile(filePath);
var client = ImageAnnotatorClient.Create();
var response = client.DetectLabels(image);
foreach (var annotation in response)
{
    if (annotation.Description != null)
        Console.WriteLine(annotation.Description);
}

I'll drop this into a new static method in my VisionApi class library.  To re-use the sample code I'll need to pass the file path into the method call and then return a list of labels.  I'll mark the method private so that it can't be directly called from the Event Processor Addin.

private static List<string> InvokeDetectLabels(string filePath)
{
    List<string> labels = new List<string>();
    var image = Image.FromFile(filePath);
    var client = ImageAnnotatorClient.Create();
    var response = client.DetectLabels(image);
    foreach (var annotation in response)
    {
        if (annotation.Description != null)
            labels.Add(annotation.Description);
    }
    return labels;
}

Now I can go back to my record controller and build-out the logic.  I'll need to extract the record to disk, invoke the new InvokeDetectLabels method, and work with the results.  Ultimately I should include error handling and logging, but for now this is sufficient.

public static void AttachVisionLabelsAsTerms(Record rec)
{
    // formulate local path names
    string fileName = $"{rec.Uri}.{rec.Extension}";
    string fileDirectory = $"{System.IO.Path.GetTempPath()}\\visionApi";
    string filePath = $"{fileDirectory}\\{fileName}";
    // create storage location on disk
    if (!System.IO.Directory.Exists(fileDirectory)) System.IO.Directory.CreateDirectory(fileDirectory);
    // extract the file
    if (!System.IO.File.Exists(filePath) ) rec.GetDocument(filePath, false"GoogleVisionApi", filePath);
    // get the labels
    List<string> labels = InvokeDetectLabels(filePath);
    // process the labels
    foreachvar label in labels )
    {
        AttachTerm(rec, label);
    }
    // clean-up my mess
    if (System.IO.File.Exists(filePath)) try { System.IO.File.Delete(filePath); } catch ( Exception ex ) { }
}

I'll also need to create a new method named "AttachTerm".  This method will take the label provided by google and attach a keyword (thesaurus term) for each.  If the term does not yet exist then it will create it.

private static void AttachTerm(Record rec, string label)
{
    // if record does not already contain keyword
    if ( !rec.Keywords.Contains(label) )
    {
        // fetch the keyword
        Keyword keyword = null;
        try { keyword = new HP.HPTRIM.SDK.Keyword(rec.Database, label); } catch ( Exception ex ) { }
        if (keyword == null)
        {
            // when it doesn't exist, create it
            keyword = new Keyword(rec.Database);
            keyword.Name = label;
            keyword.Save();
        }
        // attach it
        rec.AttachKeyword(keyword);
        rec.Save();
    }
}

Almost there!  Last step is to go back to the event processor add in and update it to use the record controller.  I'll also need to ensure I'm only calling the Vision API for supported image types and in certain circumstances.  After making those changes I'm left with the code shown below.

using System;
using HP.HPTRIM.SDK;
using CMRamble.VisionApi;
 
namespace CMRamble.EventProcessor.VisionApi
{
    public class Addin : TrimEventProcessorAddIn
    {
        public const string supportedExtensions = "png,jpg,jpeg,bmp";
        public override void ProcessEvent(Database db, TrimEvent evt)
        {
            switch (evt.EventType)
            {
                case Events.DocAttached:
                case Events.DocReplaced:
                    if ( evt.RelatedObjectType == BaseObjectTypes.Record )
                    {
                        InvokeVisionApi(new Record(db, evt.RelatedObjectUri));
                    }
                    break;
                default:
                    break;
            }
        }
 
        private void InvokeVisionApi(Record record)
        {
            if ( supportedExtensions.Contains(record.Extension.ToLower()) )
            {
                RecordController.AttachVisionLabelsAsTerms(record);
            }
        }
    }
}

Next I copied the compiled solution onto the workgroup server and registered the add-in via the Enterprise Studio. 

2018-05-19_7-57-09.png


Before I can test it though, I'll need to create a service account within google.  Once created I'll download the API key as a json file and place it onto the server.

The API requires that the path to the json file be referenced within an environment variable.  The file can be placed anywhere on the server that is accessible by the CM service account.  This is done within the system properties contained in the control panel.

2018-05-19_7-51-45.png

Woot woot!  I'm ready to test.  I should now be able to drop an image into the system and see some results!  I'll use the same image as provided within the documentation, so that I can ensure similar results.  

2018-05-19_8-16-19.png

Sweet!  Now I don't need to make users pick terms.... let the cloud do it for me!

Creating an installer for an addin

In a previous post I created my Tesseract OCR client add-in.  To test that it worked properly, I registered the client add-in using the debug output path for the assembly location.  This allows me to debug the add-in but won't work on any other workstation.  Therefore I need to package the add-in into an installer, which would place the required files in a consistent location I can reference when registering the add-in.  

To create an installer you'll need the WiX toolset.  You can then add a new project to the solution using the Setup Project for WiX v3 project template, as shown below.  Note that can you create multiple installers within a given solution (which I'm doing since I have two different add-ins: client and event).  

 
2017-11-29_13-52-32.png
 

Anytime I add a new project to the solution I revisit the configuration manager.  Since I can envision wanting to debug the add-in without any need to create an installer, I decide to create a new solution configuration named "debug (installers)". 

 
Note the active configuration (debug) does not build installers

Note the active configuration (debug) does not build installers


I leave the existing debug configuration alone and then modify the new one.  The debug installer configuration should build all of the projects.  Installing that output allows you to attach a debug session to an installed copy of the add-in.  The release configuration is identical, except each project configuration is set to release.

 
2017-11-29_14-00-48.png
 

The WiX project template results in one file being creating within the project: "Product.wxs".  Before tackling that file, I immediately add a reference to the addin project and the WixUIExtension library.  The UI extension library will allow me to create a custom UI navigation that prompts the user for the installation path.

I then created a file named UI.wxs and used the content shown below.

<?xml version="1.0" encoding="UTF-8"?>
<Wix xmlns="http://schemas.microsoft.com/wix/2006/wi">
  <Fragment>
    <UI Id="AddinUI">
      <TextStyle Id="WixUI_Font_Normal" FaceName="Tahoma" Size="8" />
      <TextStyle Id="WixUI_Font_Bigger" FaceName="Tahoma" Size="12" />
      <TextStyle Id="WixUI_Font_Title" FaceName="Tahoma" Size="9" Bold="no" />
      <UIRef Id="WixUI_ErrorProgressText" />
      <Property Id="DefaultUIFont" Value="WixUI_Font_Normal" />
      <Property Id="WixUI_Mode" Value="InstallDir" />
      <DialogRef Id="BrowseDlg" />
      <DialogRef Id="DiskCostDlg" />
      <DialogRef Id="ErrorDlg" />
      <DialogRef Id="FatalError" />
      <DialogRef Id="FilesInUse" />
      <DialogRef Id="MsiRMFilesInUse" />
      <DialogRef Id="PrepareDlg" />
      <DialogRef Id="ProgressDlg" />
      <DialogRef Id="ResumeDlg" />
      <DialogRef Id="UserExit" />
      <Publish Dialog="BrowseDlg" Control="OK" Event="DoAction" Value="WixUIValidatePath" Order="3">1</Publish>
      <Publish Dialog="BrowseDlg" Control="OK" Event="SpawnDialog" Value="InvalidDirDlg" Order="4"><![CDATA[WIXUI_INSTALLDIR_VALID<>"1"]]></Publish>
      <Publish Dialog="ExitDialog" Control="Finish" Event="EndDialog" Value="Return" Order="999">1</Publish>
      <Publish Dialog="WelcomeDlg" Control="Next" Event="NewDialog" Value="InstallDirDlg">NOT Installed</Publish>
      <Publish Dialog="InstallDirDlg" Control="Back" Event="NewDialog" Value="WelcomeDlg">1</Publish>
      <Publish Dialog="InstallDirDlg" Control="Next" Event="SetTargetPath" Value="[WIXUI_INSTALLDIR]" Order="1">1</Publish>
      <Publish Dialog="InstallDirDlg" Control="Next" Event="DoAction" Value="WixUIValidatePath" Order="2">NOT WIXUI_DONTVALIDATEPATH</Publish>
      <Publish Dialog="InstallDirDlg" Control="Next" Event="SpawnDialog" Value="InvalidDirDlg" Order="3"><![CDATA[NOT WIXUI_DONTVALIDATEPATH AND WIXUI_INSTALLDIR_VALID<>"1"]]></Publish>
      <Publish Dialog="InstallDirDlg" Control="Next" Event="NewDialog" Value="VerifyReadyDlg" Order="4">WIXUI_DONTVALIDATEPATH OR WIXUI_INSTALLDIR_VALID="1"</Publish>
      <Publish Dialog="InstallDirDlg" Control="ChangeFolder" Property="_BrowseProperty" Value="[WIXUI_INSTALLDIR]" Order="1">1</Publish>
      <Publish Dialog="InstallDirDlg" Control="ChangeFolder" Event="SpawnDialog" Value="BrowseDlg" Order="2">1</Publish>
      <Publish Dialog="VerifyReadyDlg" Control="Back" Event="NewDialog" Value="InstallDirDlg" Order="1">NOT Installed</Publish>
      <Publish Dialog="VerifyReadyDlg" Control="Back" Event="NewDialog" Value="MaintenanceTypeDlg" Order="2">Installed AND NOT PATCH</Publish>
      <Publish Dialog="VerifyReadyDlg" Control="Back" Event="NewDialog" Value="WelcomeDlg" Order="2">Installed AND PATCH</Publish>
      <Publish Dialog="MaintenanceWelcomeDlg" Control="Next" Event="NewDialog" Value="MaintenanceTypeDlg">1</Publish>
      <Publish Dialog="MaintenanceTypeDlg" Control="RepairButton" Event="NewDialog" Value="VerifyReadyDlg">1</Publish>
      <Publish Dialog="MaintenanceTypeDlg" Control="RemoveButton" Event="NewDialog" Value="VerifyReadyDlg">1</Publish>
      <Publish Dialog="MaintenanceTypeDlg" Control="Back" Event="NewDialog" Value="MaintenanceWelcomeDlg">1</Publish>
      <Publish Dialog="CustomizeDlg" Control="Back" Event="NewDialog" Value="CustomizeDlg">1</Publish>
      <Publish Dialog="CustomizeDlg" Control="Next" Event="NewDialog" Value="CustomizeDlg">1</Publish>
      <Publish Dialog="InstallDirDlg" Control="Next" Event="NewDialog" Value="CustomizeDlg">1</Publish>
      <Property Id="ARPNOMODIFY" Value="1" />
    </UI>
    <UIRef Id="WixUI_Common" />
  </Fragment>
</Wix>

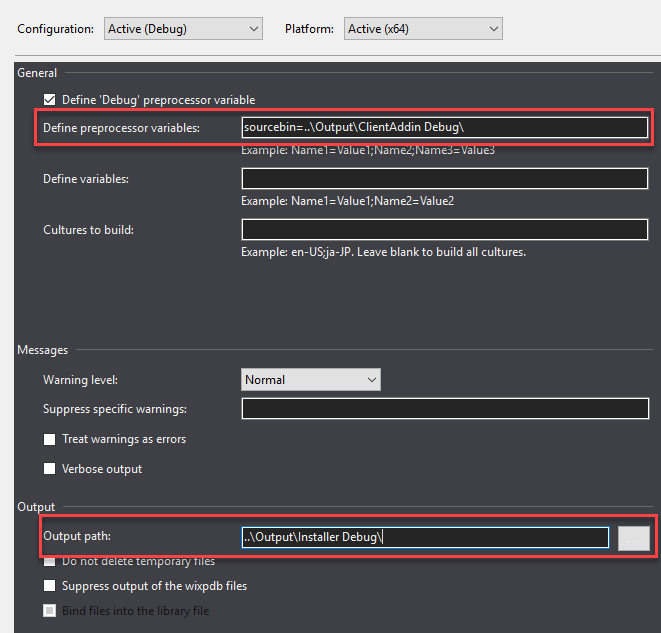
Next I modified the project so that there is a preprocessor variable for the source of files, the output is placed into an alternate location, and heat is used to harvest content.  Below you can see those first two changes.  This was done for all the project configurations.

 
2017-11-29_14-17-05.png
 

In the build events I created a heat command that harvests the files into "Content.wxs"...

 
2017-11-29_14-20-28.png
 

The full text of the command:

 
heat dir "$(SolutionDir)Output\ClientAddin $(ConfigurationName)" -dr INSTALLFOLDER -var var.sourcebin -srd -sreg -gg -cg AddinComponents -out "$(ProjectDir)Content.wxs"
 

Next I added a new file to the solution named "Content.wxs".  This file will be replaced each time the project is built (the heat command above generates the content based on the output from the other project).  The variable parameter matches the preprocessor variable name used in the project properties, effectively ensuring any future changes to the add-in will be included in the installer.

The last step is to update the product file.  Within it I added all the usual manufacturer, product, and media information.  Then I removed everything else (the default fragments provided by the project template).  Instead I reference the UI and the add-in components generated by heat command.

<?xml version="1.0" encoding="UTF-8"?>
<Wix xmlns="http://schemas.microsoft.com/wix/2006/wi">
  <Product Id="*" Name="CMRamble Ocr ClientAddin" Language="1033" Version="1.0.0.0" Manufacturer="CMRamble.com" UpgradeCode="05ff6529-a724-4eaf-a199-d920ef03bc20">
    <?define IFOLDER = "INSTALLFOLDER"?>
    <?define InfoURL="https://cmramble.com" ?>
    <Package InstallerVersion="300" Compressed="yes" InstallScope="perUser" />
    <MajorUpgrade DowngradeErrorMessage="A newer version of [ProductName] is already installed." />
    <Media Id="1" Cabinet="ClientAddin.cab" EmbedCab="yes"/>
    <Feature Id="ProductFeature" Title="Installer" Level="1">
      <ComponentGroupRef Id="AddinComponents" />
    </Feature>
    <Property Id="ARPHELPLINK" Value="$(var.InfoURL)" />
    <Property Id="WIXUI_INSTALLDIR" Value="$(var.IFOLDER)"/>
    <UIRef Id="AddinUI" />
  </Product>
  <Fragment>
    <Directory Id="TARGETDIR" Name="SourceDir">
      <Directory Id="ProgramFiles64Folder">
        <Directory Id="CMRambleFolder" Name="CMRamble">
          <Directory Id="OcrFolder" Name="Ocr">
            <Directory Id="INSTALLFOLDER" Name="ClientAddin" />
          </Directory>
        </Directory>
      </Directory>
    </Directory>
  </Fragment>
</Wix>

All done!  I repeated the process for the event processor plugin and then hit build.  The result is an installer for each.

2017-11-29_14-28-25.png

If I launch the client add-in installer I see the UI I defined in the UI.wsx file.  It sequenced the user from the welcome dialog to the installation path dialog.  Clicking next should ask the user where to install it.

2017-11-29_22-07-21.png

It behaves as expected!  The path you supply here is what you will use when later registering the add-in within the client, so it must be consistent across your organization. 

2017-11-29_22-11-03.png

Clicking next shows the ready to install dialog and an install button.  

2017-11-29_22-12-26.png

Once installation has completed, a new folder will exist on the workstation.  It should contain all of the files harvested from the client add-in project.  As the solution grows the installer should automatically keep-up with new references.

Contents of Client Addin installation on workstation

Contents of Client Addin installation on workstation

Within the client the add-in is managed by clicking external links on the administration ribbon.

2017-11-29_22-16-22.png

Then click new generic add-in (.Net)...

2017-11-29_22-17-57.png

Provide a name (this can be anything you want) and select the most appropriate path for your environment.

2017-11-29_22-21-22.png

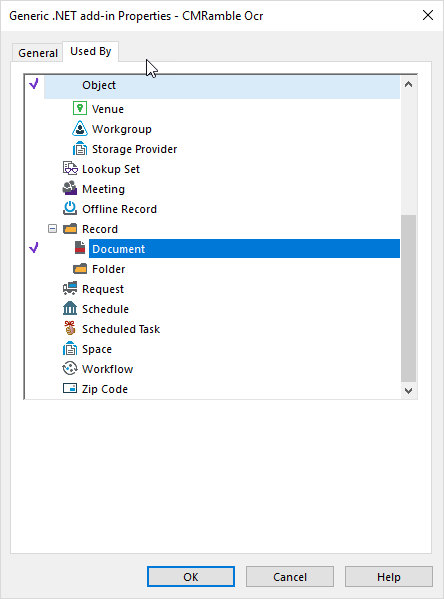
If you can click OK without receiving an error message, then you have a valid configuration (according to this workstation).  Once the valid configuration has been saved, you must click properties to enable the add-in on specific objects. 

2017-11-29_22-23-04.png

The client add-in is intended for electronic documents so I enabled the document record type.

2017-11-29_22-25-03.png

A quick test of the custom actions proves the installer worked successfully end-to-end.

2017-11-29_22-25-48.png

You can access the latest installers here.

Automating the generation of Tesseract OCR text renditions

Although IDOL will index the contents of PDF documents, it does not perform its' own OCR of the content (at least the OEM connector for CM does not).  In the JFK archives this means I can only search on the stamped annotation on each image.  Even if IDOL re-OCR'd documents, I can't easily extract the words it finds.  I need to do that when researching records, performing a retention analysis, culling keywords for a record hold, or writing scope notes for categorization purposes.  In the previous post I created a record addin that generated a plain text file that held OCR content from the tesseract engine.    

Moving forward I want to automate these OCR tasks.  For instance, anytime a new document is attached we should have a new OCR rendition generated.  I think it makes sense to take the solution from the previous post and add to it.  The event processor plugin I create should call the same logic as the client add-in.  If this approach works out, I can then add a ServiceAPI plugin to expose the same functionality into that framework.

So I took the code from the last post and added another C# class library.  I added one class that derived from the event processor addin class.  It required one method be implemented: ProcessEvent.  Within that method I check if the record is being reindex, the document has been replaced, the document has been attached, or a rendition has changed.  If so I called the methods from the TextExtractor library used in the previous post. 

using HP.HPTRIM.SDK;
using System;
using System.IO;
using System.Reflection;
 
namespace CMRamble.Ocr.EventProcessorAddin
{
    public class Addin : TrimEventProcessorAddIn
    {
        #region Event Processing
        public override void ProcessEvent(Database db, TrimEvent evt)
        {
            Record record = null;
            RecordRendition rendition;
            if (evt.ObjectType == BaseObjectTypes.Record)
            {
                switch (evt.EventType)
                {
                    case Events.ReindexWords:
                    case Events.DocReplaced:
                    case Events.DocAttached:
                    case Events.DocRenditionRemoved:
                        record = db.FindTrimObjectByUri(BaseObjectTypes.Record, evt.ObjectUri) as Record;
                        RecordController.UpdateOcrRendition(record, AssemblyDirectory);
                        break;
                    case Events.DocRenditionAdded:
                        record = db.FindTrimObjectByUri(BaseObjectTypes.Record, evt.ObjectUri) as Record;
                        var eventRendition = record.ChildRenditions.FindChildByUri(evt.RelatedObjectUri) as RecordRendition;
                        if ( eventRendition != null && eventRendition.TypeOfRendition == RenditionType.Original )
                        {   // if added an original
                            rendition = eventRendition;
                            RecordController.UpdateOcrRendition(record, rendition, Path.Combine(AssemblyDirectory, "tessdata\\"));
                        }
                        break;
                    default:
                        break;
                }
            }
        }
        #endregion
        public static string AssemblyDirectory
        {
            get
            {
                string codeBase = Assembly.GetExecutingAssembly().CodeBase;
                UriBuilder uri = new UriBuilder(codeBase);
                string path = Uri.UnescapeDataString(uri.Path);
                return Path.GetDirectoryName(path);
            }
        }
    }
}
 

Note that I created the AssemblyDirectory property so that the tesseract OCR path can be located correctly.  Since this is spawned from TRIMEvent.exe the executing directory is the installation path of Content Manager.  The tesseract language files are in a different location though.  To work around this I pass the AssemblyDirectory property into the TextExtractor.

I updated the UpdateOcrRendition method in the RecordController class so that it accepted the assemblypath.  If the assembly path is not passed then I default the value to the original value which is relative.  The record add-in can then be updated to match this approach.

2017-11-14_20-53-36.png

Within the TextExtractor class I added a parameter to the required method.  I could then pass it directly into the tesseract engine during instantiation.  

2017-11-14_20-56-41.png

If you expand upon this concept you can see how it's possible to use different languages or trainer data.  For now I need to go back and add one additional method.  In the event processor I reacted to when a new rendition was added, but I didn't implement the logic.  So I need to create a record controller method that works for renditions.

public static bool OcrRendition(Record record, RecordRendition sourceRendition, string tessData = @"./tessdata")
{
    bool success = false;
    string extractedFilePath = string.Empty;
    string ocrFilePath = string.Empty;
    try
    {
        // get a temp working location on disk
        var rootDirectory = Path.Combine(Path.GetTempPath(), "cmramble_ocr");
        if (!Directory.Exists(rootDirectory)) Directory.CreateDirectory(rootDirectory);
        // formulate file name to extract, delete if exists for some reason
        extractedFilePath = Path.Combine(rootDirectory, $"{sourceRendition.Uri}.{sourceRendition.Extension}");
        ocrFilePath = Path.Combine(rootDirectory, $"{sourceRendition.Uri}.txt");
        FileHelper.Delete(extractedFilePath);
        FileHelper.Delete(ocrFilePath);
        // fetch document
        var extract = sourceRendition.GetExtractDocument();
        extract.FileName = Path.GetFileName(extractedFilePath);
        extract.DoExtract(Path.GetDirectoryName(extractedFilePath), truefalse"");
        if (!String.IsNullOrWhiteSpace(extract.FileName) && File.Exists(extractedFilePath)) {
            ocrFilePath = TextExtractor.ExtractFromFile(extractedFilePath, tessData);
            // use record extension method that removes existing OCR rendition (if exists)
            record.AddOcrRendition(ocrFilePath);
            record.Save();
            success = true;
        }
    }
    catch (Exception ex)
    {
    }
    finally
    {
        FileHelper.Delete(extractedFilePath);
        FileHelper.Delete(ocrFilePath);
    }
    return success;
}

Duplicating code is never a great idea, I know.  This is just for fun though so I'm not going to stress about it.  Now I hit compile and then register my event processor addin, like shown below.

2017-11-14_21-09-31.png

I then enabled the configuration status and saved/deployed...

2017-11-14_21-10-24.png

Over in the client I removed the OCR rendition by using the custom button on my home ribbon...

2017-11-14_21-13-59.png

When I then monitor the event processor I can see somethings been queued!

2017-11-14_21-11-55.png

A few minutes later I've got a new OCR rendition attached.

2017-11-14_21-17-24.png

Progress!  Next thing I need to do is train tesseract.  Many of these records are typed and not handwritten.  That means I should be able to create a set of trainer data that improves the confidence of the OCR text.  Additionally, I'd like to be able to compare the results from the original PDF and the tesseract results.